Creative Costume Ideas for the Non Crafty: Mr. Roboto
Hi friends! I hope you enjoyed my previous post about Creative Costumes for the Non Crafty.
If you didn’t get a chance to check it out you can check out Cloud Costume Tutorial.
Today I’m giving you yet another, super awesome costume idea that requires NO SEWING! Best of all, my son won “Best Halloween Costume” in his grade last year.
Today I give you: Mr. Roboto

**Most of the materials used can be purchased at the Dollar Store. For the ventilation tubes check out your local home improvement store**
Execution Level: Easy Peasy

Materials Needed
Box
2 Ventilation tubes
Pack of steel scouring pads (not S.O.S. or Brillo pads)
1 or 2 packs of plastic rectangle table cloths
3 sink stoppers
3 small adhesive lights
Roll of foil
An old hat (preferably the ones where you can strap it on the bottom under the chin)
Small salad bowl (for the headpiece. Make sure it isn’t bigger than your child’s head)
Scissors
Pencil
Ruler or measuring tape
Duck or gaffers tape
Hot glue gun
If you can find a box laying around or ask around at a local store by all means get one. I purchased one at the UPS store for about 2 dollars.
***As for the size of the box that depends on your child. I wanted the box to cover the torso. It was also important that there was room for him to walk. ***
I taped my box on the bottom and cut the four open flats off with scissors. That way your child will have an opening to put their legs through.
The other end that is taped is where you will cut an opening for your child’s head to fit through. Note: YOU DON’T WANT THE HOLE TOO BIG. You want to have the box kind of rest on their shoulders. I made the mistake of cutting the hole too big. I had to go back to the store and get another box.
Next you’ll want to have your child put on the box to see if the hole is big enough. While they have the box on try to guesstimate where their arms should come out and draw two arm holes in pencil on either side.
Have them take the box off and then cut the arm holes.
Let’s get crackin’!
I purchased two (one for backup in case I messed up) plastic tablecloths from the dollar store. I bought grey, but you can choose whatever you want.
The tablecloth will be your “fabric” for the robot. Working with the glue gun, drape it, and cover it to your desired effect.
You may have to play around with it a bit before you start glueing to see how you want it to be. You want the entire box covered so it looks grey ( or whatever color you chose).
Now you get to decorate! This is the fun part, and you can get super creative here. I took four of those scour pads and used them at the top on the right and left sides of the box. You can mix it up however you want.
Next up I took two sink stoppers and took them apart. Break apart the black rubber thing on the bottom, and separate the metal stick that you push in the stopper with.

SAVE THEM CAUSE YOU’RE GONNA USE ‘EM!
Essentially you want to have just the stopper with no hardware attached. I took the two stoppers and glued them on the back of the robot.
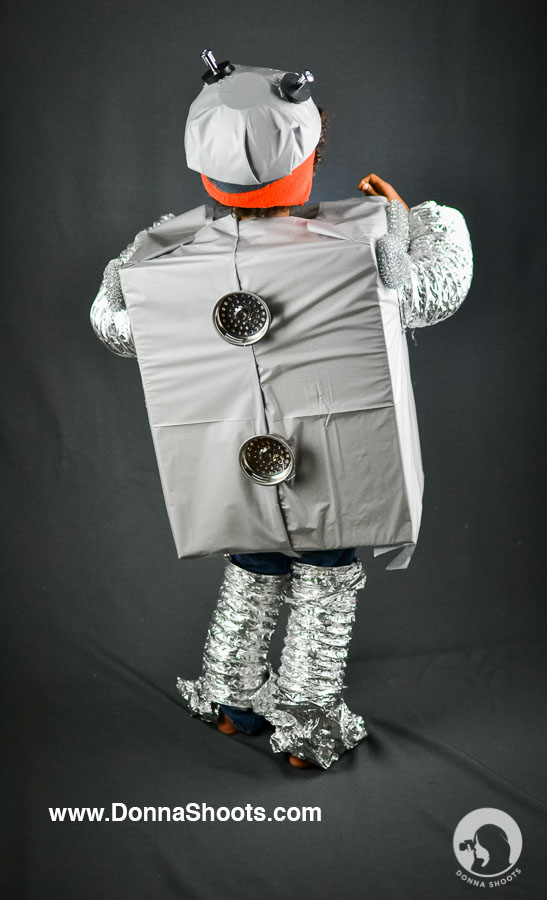
I found the little lights also at the dollar store. If you can’t find them there and if you want to spend a little you can go to a home improvement store and get something similar. I placed these three lights in the front of the robot.

Next up you’re going to create the head piece.
I took whatever tablecloth I had left and glued it to the salad bowl. So ultimately the salad bowl will look like the box. Covered in grey to match. Next up I took the two rubber pieces I had left over from the stoppers. I glued the rubber pieces onto the hat to make it look like antennae. To complete the antenna look glue the two metal sticks onto the black rubber.
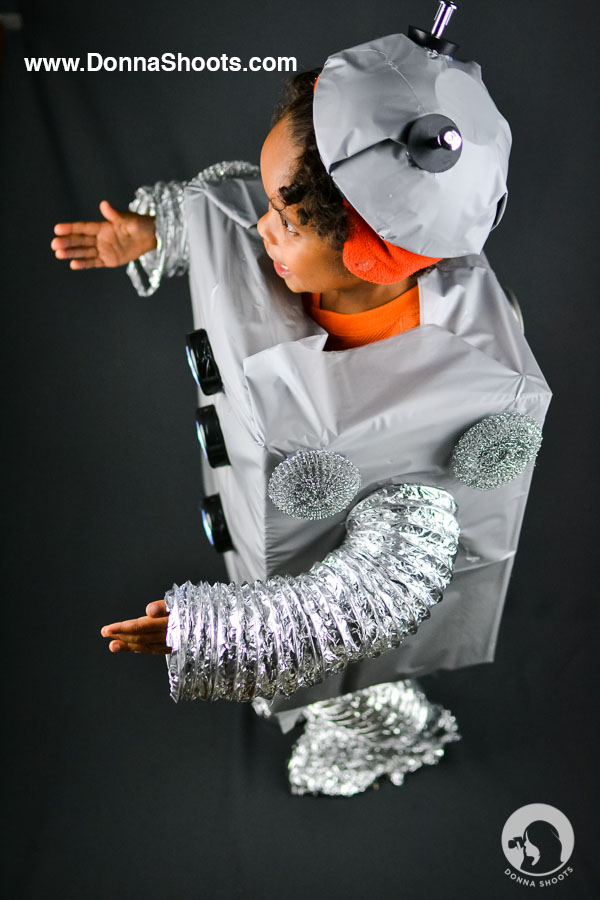
This is where the old hat comes in. I then glued the bowl onto the hat so it could be placed on the child’s head without falling off. (This is why I used the that with the chin strap)
If you don’t have either you can use a thick headband and glue with the same effect or skip altogether.
Lastly you’re going to assemble the arms and legs. I bought two ventilation tubes at the home improvement store. I cut them both in half for the arms and legs.
Have your child put on the robot costume to see how long you need the arms to be. Measure and cut accordingly. Have them take off the costume and you can then glue the tube arms to the openings of the robot box.
For the legs I just had him put one on each leg. For this shoot I used foil to cover the sneakers so it looks like robot feet.
There you have it!
